Posts

2018 Browning Strike Force | Trail Camera Review

2018 Browning Strike Force Pro XD Trail Camera Review

Trail cameras have become the cornerstone to every hunter’s scouting game.  Their invention has allowed hunters to learn greater detail about their game, adjust their plan accordingly, and simply hunt more efficiently. This has led to improved success across the board.  Every hunter can benefit from the data they gain from a trail camera. However, just like with any technology, not every trail camera is created equally.

When deciding on the right trail camera; numerous features need to be considered.  These include:

  • Photo Quality 
  • Video Quality 
  • Night Quality 
  • Memory Capability 
  • Ease of Setup 
  • Battery Life 
  • Convenience 
  • Portability 
  • Affordability 

Of course, one of the leaders in these technologies is Browning.  This year, they knocked it out of the park with their entire lineup of cameras. One of the favorites for this year’s lineup is the Strike Force Pro XD. It’s a feature-rich, incredibly affordable trail camera option for the avid hunter. It features dual lenses, fast response times, high quality images and video while still staying compact and portable. However, one of best advancements is in its night capabilities.

Design

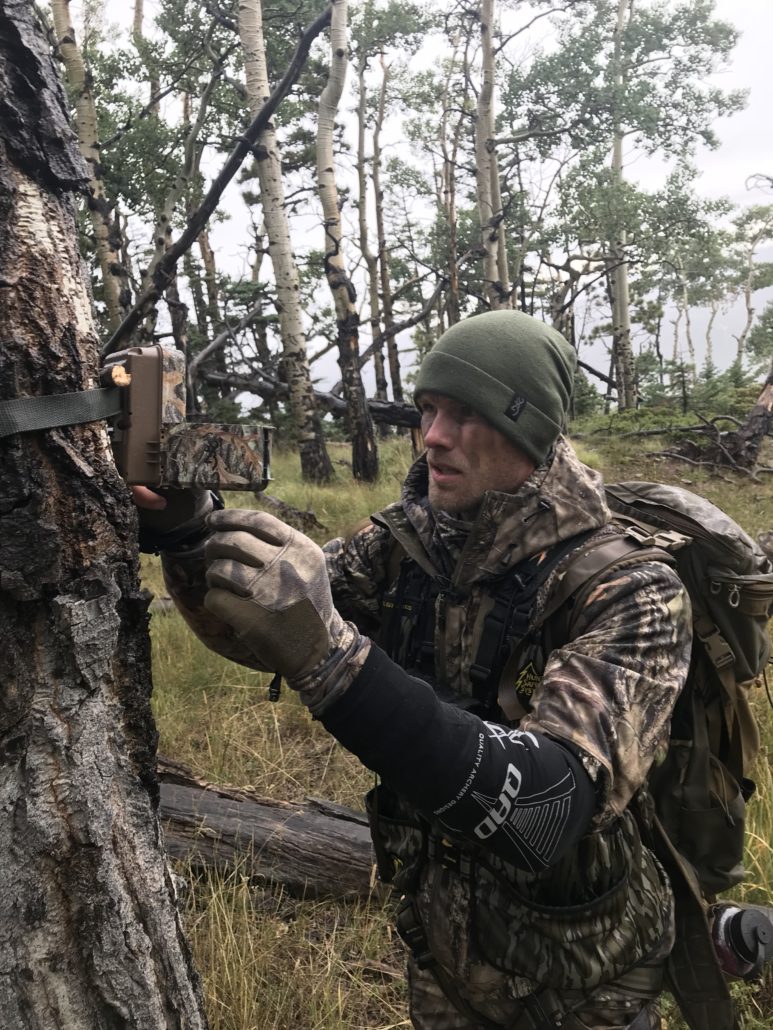
Although not the most compact of the Browning line-up, it’s still comes as a very portable package. The camera is sized at 4.25” X 3.75” X 3.25”.  It’s also easy to mount with a built in steal adjustable metal bracket and mounting strap.  It comes in Mossy Oak camo where it blends into nearly any environment it will be mounted in.  However, the design doesn’t stop there. Many of its major design features also includes: 

  • built in viewing screen 
  • dual lenses 
  • IR flash 
  • expandable SD storage 
  • 12V external jack 

It’s an absolutely loaded design that has managed to stay compact while keeping an affordable price.

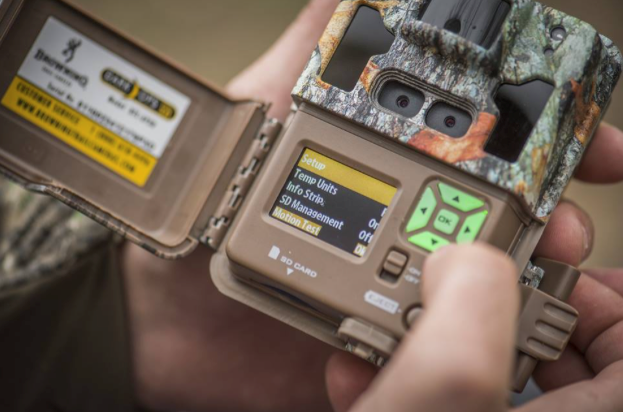
Photo and Video Quality

The Browning Strike Force Pro XD has incredible lens features. It comes with dual lens. One designated for day and one for night. It has one for day and one for night. 

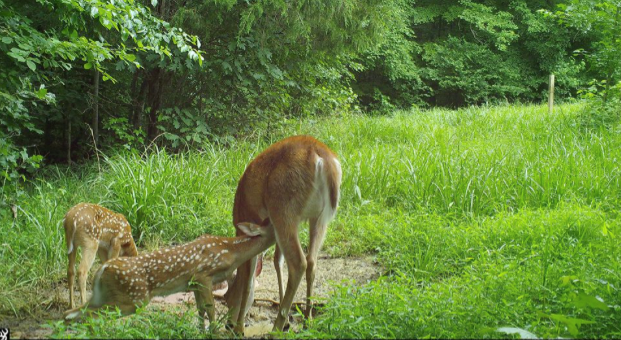
It also includes a 24-megapixel camera, complete with a .15 second trigger speed and .5 second recovery time. It’s motion detection can reach up to eighty feet; allowing you to capture plenty of action farther out from the camera. When movement is detected; there is only a .15 second wait until the image is captured.  It’s fast recovery time also assures you’ll get numerous photos of the same deer if desirable. 

As for video, it shoots in full 1080 HD and of course includes sound.  The upgrade in video quality is impressive especially when combined with its ability to take longer length videos (up to two minutes). This allows plenty of time to capture any intriguing moments while keeping it easy to manage and power efficient. 

However, it’s most striking improvement is in its night time performance.  It’s night time designated lens, in combination with its red glow IR flash, allows for stunning footage in low light conditions. Not to mention, it’s 120-foot flash range is impressive; allowing users to have a crisp view of overnight activity at a distance. The IR flash range is also adjustable, including a power save, long range, and fast motion mode.

Power

Power is an important, but highly over looked, feature of trail cameras.  At this point in technology, cameras should be incredibly efficient, lasting months in the field without any hassle.

This type of power efficiency is necessary for two main reasons: 

  • To keep a spot from being disturbed through excess activity and scent 
  • To assure valuable photos and video are not lost due to power failure 

When power does run out, their choice of batteries should also be easy to buy, affordable, and have excellent duration.

Additionally, for hunters who live a long distance away from the property, they can rest assured that the camera will still be operating weeks or months after it’s been mounted.

Therefore, finding a camera that has long lasting battery life and won’t break the bank when it needs replacing is crucial to overall camera quality. The Strike Force Pro XD trail camera has exceptional power efficiency while only needing AA batteries to operate.

In fact, it works on six AA batteries; which are both easy to purchase and affordable. Battery lifespan is highly variable based on the demand a user puts on the camera.  However, one source cited that if the camera took only 35-day and 35-night photos every 24 hours; it would last 10.3 months without needing replacement.  Considering the improvements in photo quality and features, that’s an impressive number.

Memory Capability

Another important component to consider when purchasing a trail camera is SD card storage.  The longevity of the battery only matters if there is enough storage capacity to handle the data.  Not to mention, nothing is worse than checking a camera and realizing it ran out of storage two weeks ago (or that it copied over the first two weeks of images!). Therefore, what is the solution to this? It’s finding a camera that has expandable storage.

The Browning Strike Force Pro XD provides just that.  Not only does it allow for expanded SD storage up to 512GB (which is quite a lot of space I may add) but it also allows for on device memory card management. This means you can save and erase files right on the spot.  This is incredibly convenient when you need to clear space on a whim.

Ease of Use

The Strike Force XD’s 1.5” color view screen and simple keypad helps make programmable adjustments a breeze.  The keypad is well lit for lowlight conditions and the design is easy to use.  The camera has an easy to find SD card reader slot to hold its cards (ranging up to 512 mb in size).
This well design camera makes viewing and managing photos on the spot a breeze.

One of the Best Cameras for 2018

The Browning Strike Force Pro XD is a feature rich device that will be hard to beat for 2018.  

It provides incredible day and night picture quality, HD video, efficient power, expandable storage, that all fits in a well-designed container.

Additional settings include rapid fire images, multi shot images, time lapse mode, programmable picture delay, and more. It’s compact size, vast features, and exceptional photo quality makes it an incredible bargain.

Coming in at only $199 it’s going to be hard to beat.

Archery Fit Archery Tips | Centering Nocking

Center Nocking and Tuning a New Bow

Setting up a new bow is always a challenge and can at times be frustrating. The best approach is to make the process as simple as possible and minimize the frustration by developing a step by step procedure to use as a guide.

Tuning a New Bow

The first step is to adjust a new bow to the desired draw weight and draw length plus properly timing the cams. Once that is accomplished the next important step in the process is the centering of the nocking point between the axles of the bow. This is simply done by measuring the distance between the axles and using the midpoint to locate the position of the physical nocking point. This is the initial step in what can be a prolonged tuning procedure but it is the best place to start as it develops a base around which the remainder of the process centers.  The nocking point and the horizontal position of the arrow rest are at the heart of a well tuned bow. By centering the initial nocking point between the bows axles and adjusting the arrow rest accordingly with the string splitting the arrow when viewed from the string side it puts you in the ball park. (Note: The horizontal position of the arrow rest indicated is for a release shooter. Finger shooters may find the point of their arrow laying slightly outside the string when viewed from the string.) This now becomes the basis for the tuning procedure.

Ultimately bow tuning is a series of adjustments followed by trial and error. There is no one size fits all. Everything you do, touch, or adjust when tuning a bow does not act by itself alone. It is combined with the entire bow and you as the shooter. So when you make a slight change to the nocking point you could find you may also have to make a slight correction to the position of the arrow rest which in turn could require another very slight adjustment to the nocking point. This is not meant to be confusing or intimidating but to stress that tuning a bow is a series of steps each of which brings the bow closer to a perfect tune. Centering the nocking point between the axles helps minimize the number of steps and changes required as it puts you closest to what will be the final position for the nocking point. It also helps minimize the total number of steps required in the tuning procedure which makes it a very logical first step.

The results of a perfectly tuned bow should be a bow/arrow set-up that hopefully produces perfect arrow flight but also a set-up that not only shoots well but one that is forgiving and minimizes shooter errors.


Shooting machines eliminate the human element and therefore human error. They are excellent for the testing of new products such as arrow rests, stabilizers, different styles and fletching shapes, broadhead flight, and a whole host of other tests that have led to some major advancements in archery technology. In addition they are capable of shooting exceptional groups and can clearly show the difference in arrow spine and fletching combinations. They also can produce excellent groups from an outoftune bow because the “machine”, unlike a human archer shoots every arrow exactly the same. An archer should strive for a bow that is tuned for not only the mechanical components, bow, arrow, rest etc. but for the archers form as well. The ultimate bow is one that minimizes human error as much as possible and allows what should have been a 10X to be a 10 if form is not perfect instead of a nine or even an eight. 

Bow Tuning Methods

There are numerous methods used for bow tuning from the bare shaft test to paper tuning and all can produce excellent results.  All involve a series of shots followed by recommended adjustments and retesting. When using the method of centering your nocking point between the axles of the bow physically it may not be necessary to move your actual nocking point if the tuning method you are using suggest to do so. Moving the arrow rest vertically will accomplish the same desired result. Raising the rest actually lowers the nocking point while lowering the rest raises the nocking point all while keeping the nocking point centered between the axles. It is also important to note that effective changes can be made when using certain arrow rests without actually changing the rests physical position. When using an arrow rest with an adjustable spring tension, tightening the spring tension will act the same as raising the rest while weakening the spring has the opposite effect. When using a springboard or lizard tongue style rest, changing the thickness of the rest will act in the same way. A stiffer, (or thicker), launcher acts the same as lowering the nocking point and a thinner, (or weaker), launcher acts the same as if the nocking point was raised. 

Normally when making adjustments most archers simply reshoot the bare shafts or perform another paper tear test. This is fine, but adding another “group test” after each adjustment is highly recommended. Sometime the smallest change will change the size and shape of the group produced.  Make up a series of simple targets with the same size aiming dot. Fire four to six arrows at the same distance after each adjustment. Number each target and record the measurement of each group overall noting anything unusual. Note on each target the adjustments made and number the targets in order of sequence. As the groups grow tighter repeat the shooting part of the test from longer ranges again noting conditions and changes. Observe your targets for the tightest groups overall over a series of shots. The tightest groups will also be from the most forgiving set-up for your shooting style. That now becomes the ultimate set-up for that bow.

Once you are done with the tuning process record everything. Note the vertical and horizontal position of the arrow rest, the height of your peep from the nocking point, the distance between axles etc. This is valuable information if in the future you have an equipment failure or as a reference guide when you go to set up your next new bow.

When shooting different bow models and different bow manufacturers pay particular attention to the ones that “feel” the best. All modern bows are basically good shooters but some bows will fit your shooting style better than others. Many shooters think they can buy accuracy by spending more money but accuracy comes from shooting, shooting and more shooting. When you have enough shooting experience you can actually feel the difference between different bows. When selecting your next bow don’t immediately spring for the most expensive one but instead go for the one that “feels the best”.

10 Shooting Details to Focus on Improving this Summer

Archery Tips | 10 Things To Work On This Summer

With warmer temperatures and longer days, summer is the ideal time to focus on some of the finer details of your archery shooting performance. Summer bow practice is common place for any bow hunter, but focusing on specific details could drastically improve your performance. From refining your thought process to improving your breathing, details lead to being a more consistent archer. For this archery tips blog, Samantha and I outline 10 shooting details you should focus on during your summer bow practice.

1. Shooting Stance

This is a great time to focus on your shooting stance. Any variations in your stance will cause variations in your shot. When you are in that high-pressure moment of shooting a deer, it’s crucial that your stance is instinctive, and the best way to do that is to consciously practice it this summer.

I recommend opening your stance up. Many archers close themselves off from the target, which forces them to turn their head into an uncomfortable position. Instead, keep your stance open enough allowing you to feel more comfortable.

I also recommend keeping your feet shoulder length apart and toes pointed slightly out. Keep in mind, the most important aspect is what feels most comfortable to you.

Once you find a comfortable stance, have someone trace your feet. Then, leave everything set up in its exact position and practice from this mark consistently. Before long, this will become a repeatable stance when practicing and on the stand.

You can read more details on my archery stance tips here.

2. Bow Anchoring

Having a consistent anchor point is critical to success. However, despite what many archers think, making it consistent involves more than just one thing. That is why I follow a three-point process: release-to-hand, hand-to-face, and string-to-face. By keeping all three repeatable, I’m able to have a more consistent shot.

Release-to-hand means keeping the release in the same spot in the hand during every shot. To do this, find a place that feels comfortable to you than consciously practice it until it becomes the only place that feels right. Marking this spot on your hand may even be beneficial in the beginning.

After your release-to-hand position is set, find a comfortable hand-to-face position. I personally recommend lightly touching your hand to the same place on your face every time. For me, this position is placing my knuckles along the jaw line.

The third and final anchoring point to practice this summer is your string-to-face contact. I recommend lightly touching the string to your nose. This is one of the easiest places to anchor consistently, helping prevent slight movements that would otherwise be hard to trace along the face.

For a more in depth look at anchoring, you can read my three point anchor article here.

3. Back Tension Form

Summer is a perfect time to refine how you draw your bow. When it comes to this form, sometimes small changes can make significant differences. One of these changes may be how powerful your draw is. For example, one of the issues I’ve had with my draw in the past has been my use of the traditional “back tension” method. Although this was once necessary, with the modern technology found on bows, I’ve found that a powerful back tension draw is no longer relevant. In fact, too much of this “push and pull” can be the cause of inconsistencies.

Why is this? Because modern bows now have greater let off. This means that too much “push and pull” allows for too much force with nowhere to go.

For example, once you hit the “back wall”, your energy needs to be transferred somewhere else. This energy is often then transferred to your release arm, causing disparities in your shot consistency. That’s why if shot consistency is an issue for you, now is the time to try something different.

With the let off technology of newer bows, a less aggressive approach can be beneficial. Instead of using the traditional back tension method, try to relax during the motion instead. Use just enough muscle to get the string back to the stop. Then, let the bow do the rest.

This motion will requiring using less muscles, resulting in less fatigue. Remember, the more consistent you can be, the more accurate you will be.

Check out my full blog on back tension form here.

4. Grip

Torque is another cause of shot inconsistencies, and is something that should be improved upon this summer. To keep torque limited, I recommend gripping with only one muscle. This is achieved by sticking your thumb at the twelve o’clock position, then turn it to the two o’clock position while keeping the rest of your fingers tucked behind the grip. That way you are taking away the “life-line” of your hand. This reduces the chance of “over-gripping”, which is the cause of the torque.

It’s also critical to keep your grip “relaxed”. That’s why I recommend spending this summer consciously practicing a loose and minimal grip. That way it’s a subconscious response this fall.

Watch my video on the importance of your archery grip and torque here.

5. Mental Focus

Usual summer bow practice is the perfect time to prepare for stressful situations. Instead of calmly shooting in your backyard, try to ramp up the stress. These are the situations that cause your adrenaline to pump and make your knees weak. However, you might be wondering “how do you prepare for these stressful situations that you can’t replicate?” The answer is to subconsciously prepare for them.

To do this, it’s important to spend your time focusing on one small spot. By training yourself to do this, you’ll teach yourself to be more consistent no matter how hard your adrenaline is pumping. By learning how to focus on only a small spot this summer, you can learn how to subconsciously focus on only one small spot this fall. Being able to do this under stressful conditions will be critical to your success.

Read my advice on preparing your body, equipment, and especially your mind here.

6. Breathing

Something as simple as practicing your breath can help you execute a great shot when you need it the most. That’s why this summer is the perfect time to practice when to breathe. Learning when to breathe, and doing it repetitively, will be the key to keeping your composure come fall.

It is important to breath at the right moments. There are key times when I recommend breathing. First, I recommend breathing during the draw. Then, I make sure to take a final breath as the pin settles in, and hold that air in my lungs as I release the shot. It’s important to keep in mind that breathing too early will cause panic, while breathing at improper times will cause the pin to bounce. That’s why practicing breathing this summer will help you execute it subconsciously when you need it the most this fall.

Read my blog on breathing while shooting here.

7. Target Panic

This summer is a great time to combat target panic. Many archers will come down to the target and when they reach the middle, they will immediately fire the shot.

To improve this, I recommend taking two weeks this summer to practice aiming without ever firing a shot. In fact, I don’t even recommend that you put your finger on the trigger.

Instead, simply pull back, aim, and hold. When the shot starts deteriorating, let up and regroup. Do this fifty to sixty times a day for the next two weeks. Before you know it, that pin will sit there longer than before. This helps you keep your composure in the field, and reminds you that seeing your target doesn’t mean it’s the perfect time for a shot.

Here is a blog and video with a solution to beat target panic.

8. Thought Process

Just like everything else in this guide, having a consistent thought process is crucial for execution, especially when faced with buck fever. Although it’s always important to practice this process, summer is a perfect time to make this process better.

Everyone’s process is different. However, my thought process consists of a mental checklist. Here I focus on a single step of the process rather than the big situation. This means focusing on ranging and aiming, rather than releasing. By practicing the steps in this guide, the release ends up being a subconscious movement, and I won’t succumb to the pressure of buck fever.

9. Shot Timing

Accuracy is all about repeatability. Shot timing is no different. This means trying to keep the same amount of time between the anchor and the release. For me, this is a three to four second window from the time I “anchor” to when the release fires. Staying consistent with this time is crucial to keeping groups as consistent as possible.

Here is a video on my tips for archery shot timing.

10. Focus on Scenarios

After you’ve been consistently improving your shooting technique, I recommend spending some of your summer bow practice sessions focusing on each possible scenario you may be faced with. This means if you might be shooting sitting down, then practice from a seated position. If you are a spot and stalk hunter, then practice shooting from kneeling position. Consider practicing from different angles, different stands, and especially different distances. Utilize the consistencies you’ve built from focusing on the tips listed above, and put them to use in real world situations.

The Ultimate Goal

All of these points and archery tips have one goal: to help you become more consistent. As I’ve mentioned before, repetition is everything in archery and summer is the perfect time to make the smallest details consistent. Putting conscious effort into these details and practicing them consistently, will allow you to repeat them instinctively. This will assure you are going to perform at your best when you are faced with that buck of your dreams this fall.

The Archery Tip No One Knows | Tuning Arrows Before Fletching

The Archery Tip No One Knows

This is an archery tip that not many people know about. Sure everyone knows about why you should tune your arrows, and how to fletch an arrow, but rarely have I heard about tuning arrows before fletching is applied. This tip should help you become a better archer and bow hunter.

I start by bare shaft tuning my bow, then the next thing I do before I fletch my arrows is take that arrow and shoot it into the target. The idea here is that I can see the natural launch of the arrow out of the bow. If the arrow launches out of the bow left, then I will fletch it with a left helical. If the bow launches the arrow right, then I will fletch the arrow with a right helical. This fletches with the natural launch of the arrow, creating a lot more forgiving bow setup.

If you don’t do this, and fletch on the wrong side of the arrow, you will tend to get a knuckleball effect. Say you have an arrow with a natural left launch, but fletch it with a right helical. The arrow will immediately launch left, but will have to correct itself in flight to the right. In that process the arrow could have a lot more movement, throwing off its flight and destination on target.

This is one archery tip that I don’t know if anyone knows. One thing is for certain, this tip could help you become a better shot! For more of my archery tips and archery videos visit the bow blog, my YouTube channel, or archery fit section of bowlife.com.

Post Season Bow Hunting Gear Care

Post Season Bow Hunting Gear Inventory and Storage

The thrill of the chase has come to an end and spring will be here before you know it. For many bow hunters it is time to pack away bow hunting gear for storage during the off-season. For other bow hunters and competitive shooters, it may be just the opposite. This is the time to get some practice in and adjust/tweak your gear to perform better. Whatever the case, the winter months provide time to properly adjust, maintain and care for your bow hunting gear.

Bow Hunting Gear “To Do List”

Frayed strings, rusty bolts and screws, soured clothing, moldy backpacks…if you want to avoid any of these problems follow the “to do list” below.


Gather

Like most hunters, at the end of the season you will have gear scattered in a multitude of places; your vehicle, in the laundry room, gear bags, rubber tubs, and the floor in your gear room. To start the task at hand, you will need to designate a place to gather all those items in one place!  

Inspect

While you have all of your gear in one place take inventory of what you have and what needs to be replaced or repaired. This is also the perfect time to take advantage of the end of season sales in big box stores and online. Look to replace any batteries or worn out gear.  Also, inspect your safety equipment, your stands, your arrows, and of course your bow. Take notes and create a list of items that need attention.

Method and Area of Storage

Preparing a permanent hunting gear storage area, away from direct sunlight, heat, or dampness will ensure that your gear will be ready for next season with little effort. Carbon lined or ozone-generating boxes are great options for storage. A simple and affordable Rubbermaid box will suffice and is stackable so you can store clothes and gear by season. It is important that your storage container has a sealable lid to keep any scents from permeating the gear inside. Storing with earth scented dryer sheets, scent wafers, or natural fiber such as dry cedar chips or pine twigs can add a good cover scent.

Clothes

Wash and dry all clothing, base layers, mid layers and outer layers with scent-destroying detergent and dryer sheets. For heavier items, line drying is recommended. Fold each piece for storage in a scent-proof gear bag or large sealing tub. Include socks, gloves, beanies, and caps.

Footwear

Often hunters will splurge in investing in good hunting boots, after all, boots are one of the most important components of hunting gear. Inspect your boots for splits, cracks, worn insoles, and replace if necessary. Rubber footwear should be brushed off and wiped down with a damp cloth. Remove insoles for inspection, replace if needed, spray boots inside and out with scent destroying spray and allow to air dry. Do not use soaps or chemicals on rubber boots; chemicals over time can break down the rubber. Leather boots should be brushed off removing mud and debris, and wiped down with a damp cloth. Inspect the insoles and use scent destroying spray inside and out, allowing them to air dry. After the boots have dried completely, use a good leather conditioner with weatherproofing to condition and store the boots.

Backpacks

Empty your backpack out completely, all pockets, and shake out any dirt and debris that may have ended up inside it. If necessary, wipe down the interior with a damp cloth. Brush off any mud and wipe down any areas that may have dirt or stains. Store the backpack empty making it easy to pack for storage.

Small Hunting Gear and Accessories

Small hunting gear like ratchet clippers, tow ropes, knives, screw-in hooks, or any other gear needs to be stored. All liquids should be discarded and purchased fresh the next season, especially any animal urine or estrus. This includes scent destroying sprays because many of these sprays only have a 3 to 6-month shelf life of effectiveness after opening. Binoculars need to be wiped down and stored in the products original case or directly in the storage method.

Deer Calls

Any mouth calls that you have used during the season needs to be wiped down and completely dried before storing to keep bacteria from building up and deteriorating or locking up the working parts such as latex and rubber rings on reeds.  

Electronics

Remove batteries from all electronics you do not plan to use until next season such as GPS units, rangefinders, flashlights, scent dispersing units, and game cameras to deter from possible battery corrosion, damaging and rendering the product useless.  

Caring For Your Bow

Wipe down the riser, limbs, and cams of your compound bow or the stock, fore-end, and limbs of your crossbow with a damp cloth or scent eliminating wipe. Inspect all moveable parts, screws, bolts, string wear, sight, and rest. Should your strings need to be replaced now is the perfect time to do so. Regardless if you have new or old strings, you will need to wax the strings for storage. You can use a small amount of oil to coat any bare metal bolts, washers, or screws to keep them from rusting in storage. Do not hang your bow by the strings for storage; this can cause issues with the strings stretch and cam timing. The best method of gear storage for your bow is in a bow case, if at all possible.

Taking the time to do this post-season routine will not only extend the life of your gear but it is also going to save you valuable time. While proper care and storage is important for your bow hunting gear, don’t let it sit too long during the offseason. Use this time to practice and prepare for next year’s deer season or the upcoming spring turkey season. Need some things to work on? Check out the archery and bow hunting tips in the “Archery Fit” video section below!

Levi Morgan’s Mathews Triax Bow Review

Mathews Triax Bow Review

Today I want to talk to you about what has been so exciting for us lately, the all new Mathews Triax™ bow. In this Mathews Triax™ bow review I will tell you the reasons why I feel Mathews absolutely hit it out of the park with this bow!


I have used this bow for several hunts. It has been tested with mountain hunts, whitetail hunts, and spot and stalk hunts, and the size of this bow is perfect for every scenario.  Now this bow is 28 inches axle-to-axle, which many of you might think is a short bow for someone with a long draw length like me. However, I have this bow at its maximum draw length and this bow works for me! I have sacrificed zero accuracy, and this is due to several reasons. The first is the Crosscentric Cam system, a very successful cam system requiring less human effort but still has the same power and same speed as a more aggressive cam system. This bow also features the new and improved harmonic 3D damping technology. Naturally the bow wants to wiggle left and right on the shot.  With the new technology however, the bow is almost completely dead in the hand without the addition of any stabilizers.

In my opinion Mathews hit it out of the park with the all new Triax™ bow, and you need to give one a try.


“Archery Fit” Ep.8 Bow Setup Notes | Bow Life TV

Levi’s Archery Tips for Bow Setups

On this episode of “Archery Fit” fueled by MTN Ops, I quickly run through some archery tips regarding bow setups. All of us at one point or another had that absolutely perfect bow setup. The setup was forgiving, accurate, and comfortable more than any bow you have ever shot. That bow setup could be described as that “dream setup”. Hopefully, today’s archery tip will help you mimic that exact setup regardless of the bow you shoot.  

Your bow will constantly be changing year to year. Whether you are switching models or installing new strings, each and every bow has its own personality. However, we can take any model bow, for example, a Matthews TRX, and set it up to get as close as possible to that dream setup by taking detailed measurements of our best setup. What I do and what I have learned to do the hard way is to simply write every detail down about the bow once I find the perfect setup.  


Here are some of the measurements you should write down:  

  • Draw weight 
  • Draw length 
  • Holding weight 
  • Axle-to-axle measurements 
  • How long the nocking loop is 
  • Bow rest positioning 
  • Brace height 
  • Distance from top axle to nocking point 
  • Distance from bottom axle to nocking point 
  • Stabilizer setup 
  • Arrow setup 

With these notes, you should be able to set your bow up close to or even to the exact feel as the perfect bow setup you had in the past! 

Find more archery tips, advice, and information here: https://www.bowlife.com/archery-tips-tricks-news/ 

Also check out the Bow Life Apparel: http://shop.bowlife.com/ 

How to Accurately Shoot Extreme Archery Angles

Archery Tips | How to Shoot Extreme Angles

Archers spend hours of practice working on shot technique and form. Days, weeks, and months are spent striving to develop repeated accuracy. While in practice this can be achieved, real-world scenarios can cause archers to throw form out the window. One such scenario is when an archer is forced to shoot an extreme angle. Whether it’s in a tournament or while bow hunting in the field, you need to know how to approach shooting these tough angles correctly. These archery tips should tell you how to do just that!

When you are shooting at an angle, the most important thing to remember is to keep your proper form. This is true for every different scenario. Tough tournament courses in rugged terrain can throw even the best archers off. Hunting scenarios such as an elevated whitetail stand, down a steep incline on a fall elk hunt, or uphill at sheep are uncontrollable shot opportunities that will happen. There is no way to avoid these tough shots, so the best thing for you to do is learn how to correctly keep your form and shoot these tough angles.

The correct process of shooting tough angles can be broken down into a two-step process.

Step 1: Starting with correct form

When shooting extreme angles the bow should be drawn back level using the same correct form that is used in practice. The bow is drawn level and the anchor point locked in.


Step 2: Bending at the waist

Once you have drawn level and have the correct anchor you need to acquire your target. This is where the problems normally start. Most archers will skip the first step, drawing uphill or downhill immediately without first achieving the proper form. This will usually shorten their draw which will affect the shot. To correctly acquire the target when shooting extreme angles, the shooter should bend at the waist after the draw is completed. The technique of bending at the waist after the bow is drawn and the shooter is locked in allows a target to be acquired either uphill or downhill without negatively affecting accuracy.


Many coveted hunts take place in the rugged country that requires shooting at steep angles. A shot opportunity at a bighorn or desert sheep, mule deer, mountain goat, and even a big bull elk are often not presented on level ground. Rugged terrain and country often present these shots. Using these archery tips when presented with this situation will ensure that you use correct form when conditions and terrain present an uphill or downhill shot.

Learning how to shoot up and downhill is a critical skill for any archer to have. By bending at the waist and holding the correct form after a level draw cycle, shooting on steep angles can be completed accurately. Following the archery tips in this blog will allow you to shoot with the correct form throughout the entire shot regardless of the angle.

Discover more archery tips here!


“Archery Fit” Ep.7 Arrow Spine | Bow Life TV

Archery Tips | Adjusting Arrow Spine

On this episode of “Archery Fit” fueled by MTN Ops, I quickly run through some archery tips regarding arrow spine. During this episode, I wanted to discuss how to change arrow spine and why you may not be getting the best results even when you have the correct spine.  

Let’s say you have a 300 spine arrow and you start adding weight to it. The more weight you add to the front or back of that arrow, the weaker that spine becomes. The spine also becomes weaker as the arrow gets longer. Essentially, you can tune a bow just by focusing on the arrow.  

For example, if you are paper tuning your bow and experience a high tear (the arrow is weak), that is telling you to either shorten the arrow or reduce the weight of the point on the front of the arrow. On the other hand, if you get a low tear (the arrow is stiff) you can either shoot longer arrows or add weight to the point.  

Your arrow’s fletching, nock, and point are all areas where you can adjust the arrow spine to be either weaker or stiffer. Your arrow is not just a 300 spine arrow, everything you do effects that arrow’s performance, your accuracy, and what your shot forgiveness will be.  

Find more archery tips, advice, and information here: https://www.bowlife.com/archery-tips-tricks-news/ 

Also check out the Bow Life Apparel: http://shop.bowlife.com/


“Archery Fit” Ep.5 Anchoring

Compound Bow Anchoring With Levi Morgan

Today on Archery Fit fueled by MTN Ops, I talk about compound bow anchoring. Your anchor point is one of the most important aspects of archery. To be repetitive is to be accurate. In the past, I have taught a 3 point anchor– how your hand touches the release, how the release touches the string, and how the string touches your face. This last point of contact can have the greatest impact on your shot.

I think the most accurate and repeatable action you can have when anchoring is touching the tip of your nose to the string. A lot of archers happen to touch the side of their nose to the string and that is fine as long as it is repeated. The one thing you need to watch however is pressing your face against the string. This pressure can cause the string to move which can turn paper tuning into a nightmare!

Focus on your compound bow anchoring when shooting your bow, but pay special attention to how much pressure you’re putting on the string. To quickly find out if you are doing this, take your face off the string completely when paper tuning. If you’re having bad tears when paper tuning with your face on the string then you’re applying pressure.

Get more archery tips, advice, and information here: https://www.bowlife.com/archery-tips-tricks-news/